By Phillippe Berini at http://www.motophil.ch
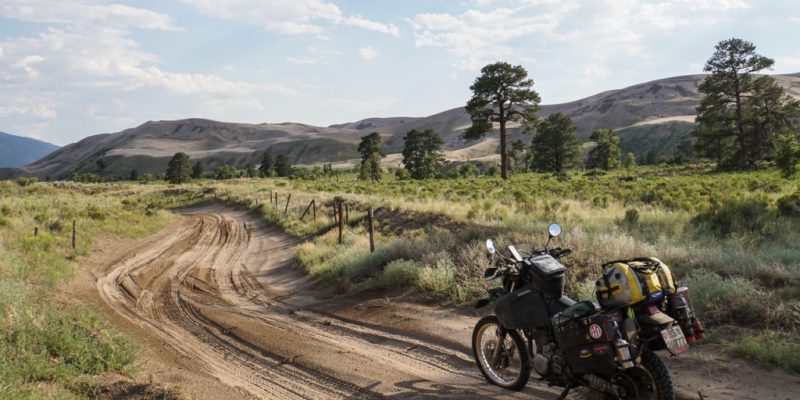
I bought the DR650 SE (MY 2003) with 8900 Km in April 2015. Coming from various bigger bikes, my first thought when test riding her was “hmmm well, is that all?” But the DR turns out to be a great bike for extended/rtw travelling. She’s lighter than many of the modern travel enduros (164 kg by specs dry), has no fancy electronics, no watercooler (one thing less to break) and easy to work on (stripped down naked in 5 minutes). She’s just light enough to handle some good offroading but heavy enough to take you down those long stretches on tarmac.

Getting the DR650 RTW Ready
Like any bike, the DR has it’s problem which most can be fixed before you leave on your journey. A good starting point is the DR Wiki. Getting the DR RTW ready however doesn’t just mean to fix the notorious problems. Ergonomics is a important topic (I can’t believe I have met rtw riders on DR’s with the stock torture seat) and storage as well. It’s clear you have to reduce the amount of stuff you bring but besides your personal belongings, camping gear, electronics you also have to carry tools, spares and consumables to keep her going in case the DR doesn’t want to.

I want to give you an overview of all modifications and additions I have made to my DR 650 SE to make her ready to take me around the world. Also read up on Adding Storage Space to the DR650 and the Mule Pack Panniers. Also you can check out other DR650 RTW Fellow’s websites who are or have been doing their extended travelling on the same bike.
Sometime I might add some more details on some of the mods, please don’t be afraid to ask about a specific mod or topic that interests you. Just leave a comment at the bottom of the page and I will do my best to answer your questions or even write an article about it.
Where to get your parts?
There are links to the products, many I bought from procycle, but you will find many of the products in other webshops, on ebay or in moto shops. Check procycle’s DR650 page. Ordering from procycle has the advantage that you can get most of the accessories and parts from one shop. However I must admit that I am disappointed in their customer service. They do not seem genuinly interested in your questions (the answers sometimes are just off from what you asked them) and there is no info on your order status. If one of the ordered items is not on stock the whole shipment is being delayed without sending you any note about this, even when paying for express shipping! Also they only use USPS for shipping which will not be of any help when outside the US. But that’s another story…
I also just used google to find parts, searched for them on ebay or while in the USA I can recommend BikeBandit as well. In Germany check Tigerparts and DR Big Shop.
List of DR650 Modifications

Fuel/Engine/Exhaust/Drive
- Acerbis 20 L Tank, upgraded to Acerbis 25L in the USA (you can get it on ebay or from procycle)
- Locking Gas Cap. This one is not good, ventilation works very slow. Usually when getting down to reserve I have to remove the cap to equalize pressure. Heard this from various other riders too.
- Removed carb inlet filter
- Added inline fuelfilter (procycle 1/4? Fuel Filters – 90 Degree or Straight or ebay or any moto shop)
- Removed the exhaust “rebreather” device (seems to be a swiss thing)
- Marving muffler (3.8 Kg vs stock 5.3 Kg). The muffler pipe broke at the bracket while on stony pass in Colorado and the hot air melted a big hole in my airbox. I have replaced the shitty muffler with a GSXR muffler and the mid-pipe from Procycle.
- Twinair airfilter installed plus a spare one
- Deluxe fuel screw (extended pilot screw)
- JT sprocket 14. Went back to a JT sprocket 15 in the front and 46 in the back. I carry a spare 15 tooth sprocket as those wear out fastest.
- DID 520VX Gold chain, plus spare masterlink and spare masterlink clips. I have lost the clip twice (even though mounted in the correct direction) so I used some silicone to make it stick.
- Procycle sprocket retainer
- Countershaft seal retainer (Must have! I heard someone had the seal pop out after using the wrong oil, and it’s not always easy to find a 10W-40 in latin america)
- Warp9 chainguide
- Removed top chainroller
- Warp9 chainguide. Fantastic device, does not need connecting to carb and no fancy electronics. A primary valve is operated by a weight while riding and shuts close when standing. After 6 months into my trip the weight moved from it’s original position and wouldn’t close the valve anymore. It was an easy fix though and Nick (the Tutoro guy) helped me through a skype videocall. I replaced the lost nozzle with the tube from a ball pen (cleaned with fuel and added some silicone to make it hold better on the tube)
- NSU Screw Fix. Check drriders, procycle or just google, there is a ton of information on this.
- IF you own a 1997/1998 model year please google “DR650 engine grenade”.
Suspension
- Cogent DDC in front fork (you do NOT need the install tool, just drop them in after filling in the oil and they will slowly work their way down)
- Procycle 7,5 shock spring
- Cogent shock shaft assembly. Rather get a full Mojave shock from cogent, my friends assembly blew up and it was all scratched! Also get a “RTW” spare part kit.
- Spare fork seals
Ergonomics/Protection
- Warp9 fatbar riser clamps
- Magura X-Line SX handlebars in black. They have a smaller crank angle (straighter than normal bars), this is more comfortable for my writs since I ride with elbows up more than not.
- Oxford Adventure heated grips (bring spare superglue as sometimes they might get loose)
- Sargent World Sport Seat standard height, I chose this over the Seat Concepts since it’s a little wider in the back. If you can I suggest ordering directly from Sargent and getting the one without the weld, unfortunately they did not ship to europe. The weld can dig in your legs a little.
- Low footpegs (I don’t like the lowering plates as they take away from ground clearance)
- Barkbusters Hardware Kit Tapered with VPS handguards (fit without any modifications). I also tried their handlebar weights but they changed the frequency of vibrations and my hands would fall asleep)
- Warp9 skidplate. I ordered the black one with oil filter case protector but procycle sent me the silver one without the extra protection. Some enduro riders recommend getting a plastic skidplate.
- Foldaway rear mirrors. I ordered mine from ebay for 10 Euros and they are actually very good, the vibration frequency does not disturb view. Not sure if those from procycle are the same. One of them broke off when I dropped the bike against a big stone. Had it replaced with whatever I could find in Mexico, but the foldaway ones are actually much better vibration wise. I would recommend just to keep the stock ones.
- milled screws for seat and side covers for quick removal (found in OBI in Germany, is like Home Depot)
- Go Cruise control, the type that you clamp on your grip and it will hold throttle by the lever on the brake lever. Very easy to use and easy to adjust throttle. Some of the best 20$ you can invest to give your wrist a break! I do NOT recommend to get the Cruise Assist, I found this very unpractical and even dangerous (throttle stays open unless you make some world class bend in your wrist)
- Warp9 4-finger levers, brake and clutch. Mainly because I can adjust the distance of the levers from the grip.
- Bajaworx Rally Windscreen. I used spacers to mount it to the dashboard numberplate to allow air to flow behind it and reduce turbulence. I also cut down the windscreen by about 10cm so that my shoulders are mostly protected from airflow but my helmet gets more air.
- Procycle case armors added, since on stony roads it might happen that a rock hits the case when dropping the bike.
- Altoids mint box attached with velcro to the top of the front brake fluid reservoir as an ashtray since I don’t like throwing my stumps out in the nature. I actually use a box from a german brand but you get the idea.
- On the left side subframe, the small bracket to mount racks is a weak point, the bracket would probably snap when doing a lot of offroad with loaded panniers. A friend welded two enforcements plates to make it stronger.
Lights
- Mini LED signal lights in the back and front. Replaced with bigger and brighter LEDs. Don’t buy the cheap ebay china stuff!
- Electronic signal relay (necessary for LED)
- 1N4004 diodes to fix the turn signal dash light short circuit. Without the diode the light’s were blinking on both sides but in a more “airplane” type of pattern (short lightbursts every few seconds). I am thinking maybe I could incorporate a switch to go around the diode to have a hazard light and use it in cities where visibility is key.
- 4XLED Superminis MIX. The MIX are not listed on the homepage, ask Marek about them. They use each two “far” beam and one “wide” beam LED. I also got the cable set with the two stage controller (stage 1: Daylight Riding Light, Stage 2: Full power). I ride with stage 1 all the time to be seen better.
- Mini LED license plate light. It’s gone by now but nobody down in latin america cares 🙂
Luggage
-
- Nomadics rear rack
- Procycle side racks. They are asymetric, meaning the left are closer to the bike than the right because of the muffler. If you want symetric check out the Moose Expedition racks. This would give you some extra space in between the left rack and the bike to mount toolboxes etc.
- Acmezoom Mulepack panniers (28L).
- *Rok Straps Pack straps on Mulepacks
- Enduristan Sandstorm 3S tankbag (waterproof). I also had a look at the (soft) Sandstorm 4H but it does not fit nicely on the tank shape of the DR, that one is more for real enduroseats with a flat design.
- Overboard Pro Sports 40L waterproof duffle. Overboard targets watersports, that’s why you might not have heard of them. But they have really cool bags if you like small extrapockets like me. I chose the 40L because it fits nicely in between the panniers. But now I want some extra space so I’m getting their 60L duffle. Be aware that their “Classic” bags have a soft exterior shell around the waterproof layer which soaks up water and makes it heavier.
- *Adhesive rubber mat for rear rack and top of the panniers (hate when everything is slipping away when put there). Ordered from ebay.
- *Bottleholder on panniers, rear side. Touratech bottleholders for two bottles on either side.
- *MOLLE base plate on the front side of the panniers. On each side a MOLLE bottle holder and a little bag attached.
- *Toolbox on the left pannier/racks made from IKEA 365+ kitchen box attached to the pannier racks with large hose clamps.
- *Enduristan fenderbag. I also have a Wolfman Luggage fenderbag but I could not fit 2 sparetubes, so I went to the enduristan one that is also waterproof. The Wolfman is now mounted on my little windscreen and holds some spares that don’t mind to get wet.
Plsease read Adding Storage Space to the DR650 and the Mule Pack Panniers for details and pictures.
Electric/Electronics
- Relay for all additional electrics/electronics
- Dual USB Charger with discharge protector on handlebar
- 12V socket in pannier
- Garmin Zumo 390.
- 28,6mm aluminium handlebar clamp for Garmin (ebay)
- Lockable holder for Garmin (ZumoLock)
- Ram Mount handlebar holder for phone
- Catalyst Multisport holder. Screwed on a ram mount diamond base because it’s more stury than the flimsy catalyst mount. But the caseholder from catalyst is great if you have the catalyst case.
- Catalyst Waterproof case for iPhone 6
- AGM Battery with more capacity
- Power distribution through fusebox for standard and mini auto fuses. Fuse box is under seat. Recommendation would be to put the fusebox behind the dash so you only have to route one cable (+) from the battery to the dash and not all those hundreds of cables (most electronic devices on the handlebar anyway)
- Removed sidestand kill switch, short circuit cable on the connector
- KOSO mini 3 multipurpose instrument with air temp, clock and volt meter. I don’t know why procycle charges 99$, I got it from german Louis where it only costs 30€.
Cosmetics
- Yamaha YZF YZ 2011 front fender (drilling holes necessary). Found on ebay.
- Reflective rim tape (ebay)
Planned modifications
- Remove weld from Sargent seat (new seat cover probably)

What to bring on your journey with the DR
Tools
Tools are a personal choice. Sure, there are certain sizes of wrenches etc you just need, but in what form that is mostly a personal preference. Some prefer to use simple wrenches while others rather use a wrench with sockets. This is just an example and sometimes you just need both of them.
Following the Tools I brought on my journey to work on the DR650. Some of the tools I hardly ever use (like I have most wrenches and sockets in the same size) but better safe than sorry. Also, when doing maintenance I am usually looking for someone who can offer to me to use the workshop where I will usually be able to use other/bigger tools as well.
- Mini Ratchet
- MotionPro Tridrive 1/4 T-handle (useful as screwdriver with the bits or as a wrench with the sockets)
- 1/4 Bitholder
- Bits Allen mm: 2.5, 3, 4, 4.5, 5, 5.5, 6
- Bits PH: 1, 2, 3
- Bits Flat: 4, 5, 5.5, 6
- 1/4 Sockets mm: 7, 8, 10, 12, 13, 14
- 3/8 Sockets: 17, 19
- 1/4-3/8 Adapter
- Allen Keys mm: 2, 3, 4, 5, 6
- Wrenches: 7, 8, 10, 12, 13, 14
- Stock Wrenches: 14/17, 19, 24, Extension
- Variable Wrench: up to 15
- Sparkplug Socket (stock)
- Feeler Gauges 26 leaves: 0.0015mm – 0.25mm
- Vice Grips small
- Mini Hammer (bought in Mexico but haven’t used it so far)
- Small Hammer cut (Use it also to put the tent pegs into the ground)
- Wire with Magnet (You never know when you drop a bolt into a tight space)
- Small Brass Brush (mostly to clean bolts)
- Small Knife
- Cable Oiler
- Working Gloves
- Motion Pro Beadbreaker/Tyrespoons (A must have if you want to change tyres on your own!)
Spareparts
Again this is a personal choice and also depends on the space available. I did start my trip with very few spares actually, mostly what I already had laying around, though I stocked up quite a bit while travelling the USA. Of course it was relatively easy to stock up in the US and I knew further down south it will be harder to get spares.
While in latin america it is still possible to get spares, mostly in the bigger cities where they have bigger suzuki dealerships, I would certainly recommend to bring those spares that are most prone to fail at some point, like bearings or gaskets. Those small spares do not take up much space and it will save you a lot of time if you have to replace something. The option is to sit around and wait up to weeks for shipping the parts besides paying expensive shipping costs and import taxes.
Here is the list of the spare parts I carry. Sorry you cannot see everything in the picture but I am not going to unpack everything that I have packed in nicely before 🙂
- Brake Handle
- Clutch Handle
- 2 Oilfilters
- Fuel Line
- 2 Inline Fuel Filters
- H4 Headlamp Bulb
- Tail/Break Light Bulb
- Various Cockpit LEDs
- 17? Tube (normal duty)
- 21? Tube (normal duty)
- TwinAir Filter
- Wheel Bearings Front
- Wheel Bearings Rear
- Steeringhead Bearings (replaced at 40.000 Km)
- Break Pads Front
- Break Pads Rear
- Fork Seals
- Cogent Shock RTW Service Kit
- 4 Chainlinks (DID VX2 520)
- Chain Masterlink (DID VX2 520)
- 15 Tooth Front Sprocket
- Universal cable set for throttle or clutch
- Header Pipe Gasket (came with the Procycle Cylinder Gasket Set)
- Various Bolts, Nuts, Washers
- Brake Caliper Bolt (If you lose a bolt you won’t find the same type/strenght easily, it happened to me, so bring one or two of these!)
- Oil Drainplug Washer Gaskets
- Washer Gaskets for Oil Lines
Consumables
All good things come in three, so another very personal choice: The consumables. You can discuss back and forth which lube is better (most carry WD40 while I always carry silicone lube spray) but the best is to bring what you are used to working with.
Of course I would not recommend bringing all the different type of lubes you have at home. And lubes you will find anywhere so don’t worry about that too much.
- Duct tape small
- Duct tape large
- Ultra strong adhesive velcro
- Stainless steel security wire (was laying around from my NSU fix so I thought I bring it, normal wire would do too)
- Piece of an old cut tube (wrapped around the superglue on the picture)
- Superglue/Quickglue (mainly to glue the grips when they come loose)
- Blue Loctite
- Ceramic paste (very heat resistant lubrication, I use it mainly for my header pipe bolts)
- Quicksteel
- A set of tyre tube patches
- H4 headlamp bulb (in the blue box)
- Tail/breaklight bulb (in the blue box)
- Various cockpit LED bulbs (in the blue box)
- A selection of bolts, nuts and washers (whatever I had at home that fits somewhere on the DR. In a little ziplock bag.)
- A selection of electrical connectors and some electrical wire (in a little ziploc bag)





Comments