
- It’s What We Do
- Contributors
- Ténéré Tragics
- Industry Players: Robin Box
- Safari ADVT
- Horizons Unlimited
- The Cold War
- Adventure Travel Film Festival
- Reader’s Pic
- Set Up to Stand Up with Craig Hartley
- The Adventure Challenge
- Triumph XC800 Tiger Across Australia
- Yamaha 2014 Super Ténéré
- BMW Airheads
- Wish You Were Here
- Reader’s Ride: Borneo
- Afraid Not with Karen Ramsay
- Packing For Adventure with Robin Box
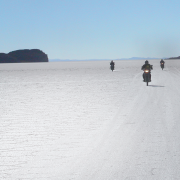
- Navigation Techniques with John Hudson
- How To Ride with Miles Davis
- No Comment
- 20 Things You Should Know About: BMW’s 650 Singles
- 10 Minutes With: Allan Roberts
- Ol’ Mate
- Reader’s Bike: Robert Holness’ KLR650 and Ural Tourist
- Checkout
Many who know me will be laughing because they know I get lost all the time.
When putting rally courses together we’ve learnt some stuff that could help any group of mates who want to put a trip together, and the first rule of being a good navigator is to carry plenty of fuel and always fill up your tank whenever you drive past a fuel station. To put a good track together you need to ride down a lot of dead ends to find the good stuff, and to do this you need fuel.

When building the APC rally course there are four parts to the process.
1. Paper maps: marking a route using a highlighter pen and making the course go through any State Forest or small farm tracks that can be seen on the map. The course usually goes through towns every 100km, and Internet sites are used to locate points of interest, especially any enduro-bike areas in the region. We try to include any local knowledge we can get, but the source needs to be someone who understands adventure-bike riding. There are some Internet sites that offer free tracks, but you never know who the source was, and to some a bitumen road is their idea of an adventure. We Google each township to see if it has fuel or accom and record the phone numbers.
2. Mapping software: we try to mark the course from the map onto the software. We’ll often use Google Earth to check if road surfaces are dirt before we include them. The course is then loaded onto GPS units. Sometimes if we can’t see any tracks on maps and we want to explore an area we’ll put a straight line through the region and then aim them from one marked road junction to another. This line marked on your GPS gives you a general direction you want to travel when you’re out on the bike exploring. We mark any fuel stations in the area using waypoints. When we get lost knowing which townships have fuel is vital.

3. Preriding and course building: we take our paper maps and make sure our GPS units are recording our tracks. When out exploring on the prerun we’ll always look for minor tracks that loop back onto our initially marked main track. We take a notebook and pen and make notes as we go. To build great courses you need to have the discipline to actually go back and try and find a better section if you think a leg was boring. Once the preriding is completed we’ll then go and look at the tracks and simply build the
course that flows well from one connector track to the next.
4. The final preride: we check our distances and complete course notes and get our timings so we can try to plan night stops. We’ll often preride our wet-weather and easy diversions to make sure gates are marked and our distances between fuel stops still work out.
A long haul
To produce a 7500km rally course I’ve usually ridden 50,000km.
The reason experienced adventure riders enter the APC Rally is because they know the value of good flowing tracks.
It’s like waves to a surfer!
We don’t expect a group of mates to go to the effort we just described, but the key to success is to always have a basic route marked on your GPS or paper maps that leads to fuel stops, and they need to be close enough together so you can go exploring. If you see bike tracks heading down a track they always need to be followed. Woodsie, who helps me put the rally course together, is always looking at his maps and he knows the general direction we need to be heading. I focus on the GPS and will follow any track I can find that is a chance of linking back to the general route we’ve marked.

Quick points
Radios are just a great device when you’re exploring.
You should never both go down a steep hill. We always send one rider down first to see if the track goes somewhere.
GPS. The adventurer’s friend
When you’re setting up a GPS for adventure riding, just use the manual and find these settings:
• Make sure you’re leaving a track where you’ve been. Set your GPS to archive daily. This way you have a better chance of one day organising your tracks
• Turn the auto zoom feature off
• Turn the guidance text feature off
• Clear all the data fields off the screen so you just see the map. You don’t need your speed or bearing, you just want to see your route and the track you’re leaving behind
• Turn off auto routing
• Set the map detail to highest
• Set the backlight so it stays on, and on its brightest setting
• When navigating, your GPS should be zoomed in to about 500m. If you can’t find the track you’re looking for, then zoom out
• Make sure you have good batteries in your GPS as a backup in case your hardwiring kit fails
• Mount your GPS where you can see it really well. Always use RAM mounts, and don’t worry if the GPS blocks out some of your dashboard. The GPS is now the most important thing you have on your bike
• When hardwiring your GPS, make sure it’s wired straight to the battery. You want it to stay on when you turn the ignition off
• If the weather conditions are really bad, have a plastic bag in your kit and put it over the GPS with a rubber band. We’ve had problems with water in extreme conditions
• Your GPS is like a boat anchor without a good base map. I reckon Track4Australia is the best mapping software you can get for adventure riding
• Your normal car GPS is useless on an adventure bike,and so is a GPS with a small screen. You’ll end up crashing trying to look at it
• Try and get your mates to get the same GPS as yourself. It’s very handy to share the knowledge. Many modern GPS units will now share tracks by Bluetooth, which is really cool
Once all of your riding group have GPS units you no longer need cornermen. That means far less dust and covering a lot more country in one day. And that can only be good!


Comments